Return to Main Page

Bread Stamp Physics

After a lot of experimentation and reading, I've collected a few observations about what makes bread stamps effective.  I won't delve too deeply into the history of bread stamps, as fascinating as it is, since there are ample works that have done a much thorough job than I could on this webpage.

Before we begin, there is a burning question that many of you have asked: is it a bread 'stamp' or 'seal.'  To be perfectly honest, I didn't really think there was much of a difference until I started reading articles about bread 'stamps.'  Seals, in the world of archeology and history, are strictly used to 'seal' something, kind of like a padlock before its actual invention.  A seal provided identification, but also evidence of tampering.  While bread 'stamps' also indicated identification (Roman bakeries were required to stamp their bread with a special seal to help trace loaves to their source and prevent fraud or theft of imperial supplies), they are not 'seals' in that they do not prevent the use of the bread.  A sealed loaf would be taboo to use except by the owner, and while the Church does indeed own the bread in the Name of Christ, the advent of the stamp was not intended to do anything other than enhance the cutting and breaking of the bread.  The stamp provides instructions to the priest on how to prepare common bread to become the Holy Gift.  The clearest evidence for this is the relatively long period between the foundation of the Church and the widespread use of special bread stamps, along with the many developments in design.  The common characteristic of bread stamp development was their specificity in drawing fracture lines: this is a universal principle for stamps after the the first four centuries of the Church.  George Galavaris' book is an excellent resource for the history of stamps.

OK, let's take a look at a stamp.  Here's one of mine, but what we are discussing here is true of every Byzantine bread stamp, and even a Russian stamp if you have a little bit of imagination.  The first thing you may notice is that the stamp is round.  Early stamps were not always so, and even now square and round stamps in simultaneous use for small loaves.  The reason you don't see large square stamps is simply a matter of physics: a square stamp pressed into a round loaf tends to disturb the roundness of the loaf.  Square loaves are not feasible, since corners brown and harden before the rest of the loaf, and they are harder to shape and keep square once the yeast goes to work.

Starting from the outside, the first important element of a stamp is the lip , represented by a red line on the photo to the right.  Bread stamps have a smooth and even lip (I have seen an exception: a Russian stamp with a raised and serrated lip, which cut out the loaf while stamping the image).  The lip guides dough out from under the seal when pressure is applied, so unevenness will ultimately cause it to snag and distort the dough, or channel it improperly.  An even lip also helps the baker judge whether he is evenly applying pressure or not.  If not, the impression will be lop-sided.  The lip also provides a vacuum seal for the stamp when it is lifted off the bread.  This vacuum action is important, since this pulls dough up into the details of the stamp and strengthens the image.

The next area is the perimeter of the stamp, marked in yellow in this image.  The perimeter of the stamp is important, since it also helps in the vacuum process.  The decorations carved into the perimeter slows down the movement of the dough from the center of the stamp to the lip, thus forcing the dough upwards because of the friction.  Once the pressure has subsided, the perimeter stores the tension of the dough and the lip of the seal, forming a vacuum at the center of the stamp.  These perimeter decorations also help prevent twisting during the lifting of the stamp, which is important if you want your imprint not to smear.

For this to work, the lip and perimeter must be flush with or lower than the center stamp.  If the stamp has a convex surface (see the lower image to the right), the dough will expand upwards and tent to bunch up the image.  This will shrink the size of the image and cause a shrivelled-looking imprint.  This problem can also occur when a stamp that is too small for the loaf is used, as it will tend to push in too deep.  Since the natural expansion of the loaf is a proportional occurance, a small imprint will tend to shrink as the rest of the loaf grows.

A stamp must also not be too large for the bread.  The dark blue area in the illustration is coolest part of the bread, which means that this area is the last to stop expanding.  It becomes the point from which all bread growth emanates.  Notice that the bread will expand in all directions, not just straight up.  If a stamp takes up too much of the loaf's surface, the image will stretch out.  One way to maximalize the amount of surface you can use is to make the loaf in two pieces, like in the photo to the right.  The joint between the two portions takes the expansion pressure off the top of the loaf, since the upper portion will bake faster than the joint, which will continue to expand later in the baking process.  The loaf shown here expanded to more than double its original size, but the image remained clear despite the poor photography.  Otherwise, try to make a loaf so that the seal falls roughly into the area between the light blue lines in the upper drawing.

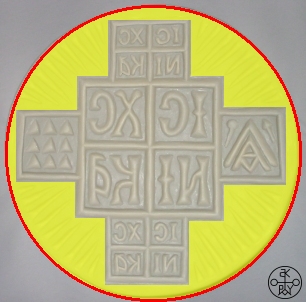
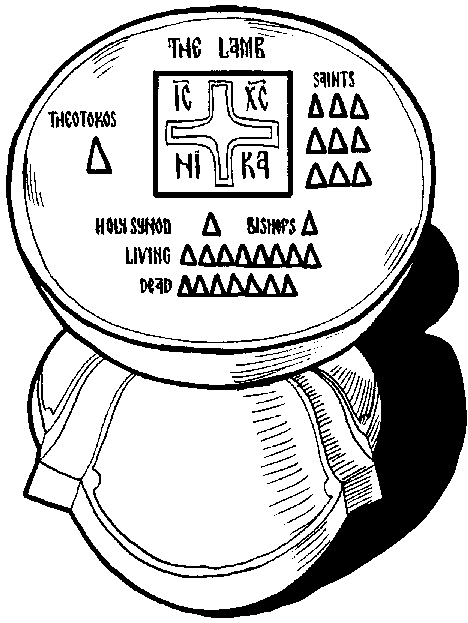
The colored portions here represent the particle portions  of the stamp.  The whole idea behind a stamp is to draw out the particles for the priest or bishop to cut.  It (almost) goes without saying that if the stamp produces a weak imprint, then the priest or bishop won't know where to cut.

The five particle portions were once individual stamped loaves (still the case in the Russian practice), symbolize of the five loaves from the Gospels (Mt 14:17-21, Mk 6:38-44, Lk 9:13-16 & Jn 6:9-13).  Galavaris documents a stamp with more particle portions, so it goes without saying that the portions are utilitarian: they are present or absent based on the liturgical needs of the community.  So stamps have only three portions, others have only one (like the Russian stamps).

The green squares comprise the particles which are used for commemorations .  It must be noted that the upper or lower portions are sometimes cut for a Presanctified Liturgy lamb, but this is not why they are there.  They are for remembering the living (upper portion) and the departed (lower portion) of the Church, if you follow the Proskomedia rite.  The Theotokos is represented by the triangle on the right made up of a stylized 'M Q' to form the piece which is extracted (flanked by the spear and the sponge of the crucifixion).  On the left are the Nine Ranks (the Forerunner, the Prophets, the Apostles, the Hierarchs, the Martyrs, the Ascetics, the Healers, the saints of the day and the 
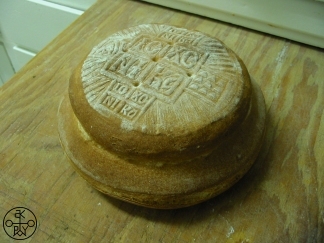
author of the liturgy.  The lower illustration should give some idea of how the extracted particles are layed out on the Diskos.

The central portion, colored blue in the picture, is the Amnos or Lamb.  This is the particle which is consecrated during the liturgy and becomes the Body of Christ.  It is the first particle to be extracted, and lays in the center of the Diskos until the Fracture, when it is broken into four pieces as traced out by the cross imprint from the stamp.

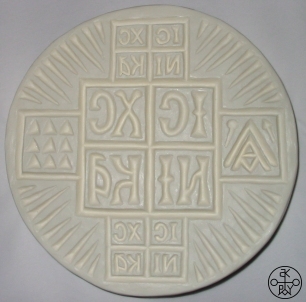
The Amnos bears an inscription, which is a later development in eucharistic stamps.  Pre-Christian stamps often bore letters.  As you have noticed, the stamp has a backwards set of Greek letters, but there are plenty of examples of stamps where it was the imprint on the loaf which ended up backwards.  Apparently, the ancients were a lot more flexible on this than we are now.  The inscription reads: IS CS NIKA, an abbreviation for 'Jesus Christ' in the upper two squares, and the word 'Conquers' divided in the bottom two.